Editing videos doesn't have to be complicated! Sometimes, you only need a quick trim for a refined clip. Whether you're cutting out awkward pauses, isolating specific parts from a longer video or shortening videos for social media, Windows 10 offers built-in tool to make the process easy. In this article, we'll walk you through the simplest way to trim videos on Windows 10 using both the native app and third-party platform f for customization. Let's dive in!
You may also interested in: 4 Best Tools to Crop MP4 Videos on Windows 10>>
How to Trim Video on Windows 10 Using Photos
Photos is a built-in tool that offers a convenient way to view, edit and share photos on Windows. However, it can also be a quick and available option to trim videos on Windows 10 if you don't to download anything new. Follow our simple guide to learn how to trim videos using the Photos app and save them as MP4 files in just a few clicks.
Step 1: Open the Photos App.
Find the video you want to trim on your computer and right-click the file to open it with Photos.
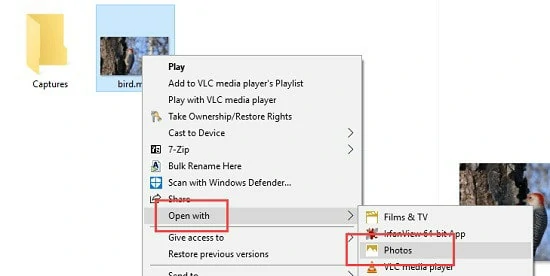
Open the File with Photos
Step 2: Adjust Settings.
Once the video is loaded, click on the video and a menu bar will show on your screen. Here select "Edit & Create" > "Trim".
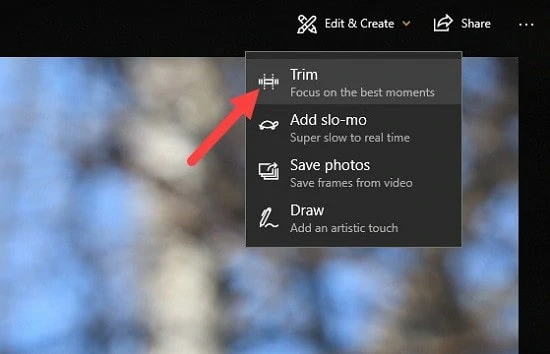
Find the Trim Button
Step 3: Choose the Trimming Section.
Drag the left and right sliders to choose the section from the video. Only the segment between two sliders will be saved.

Select the Trim Selection
Step 4: Trim the Video
When the trimming section is set up, click on Save a copy on the top menu. The portion you select will be saved to a new file as the original with _Trim appended to its name. Depending on your preference, rename it as you like.

Trim and Save the Video
While Photos app offers basic video trimming, it has several notable limitations that might greatly affect your editing experience:
So, to ensure a smooth video trimming experience, we'd like to recommend a third-party professional video trimmer. This powerful tool lets you effortlessly trim, cut, split, and crop videos on Windows 10 without any quality loss or additional downloads. Plus, you'll get access to advanced editing features to take your videos to the next level! Let's dive in!
Third-party Tool to Trim Videos on Windows 10 with Ease
FlexClip is an intuitive online video editor with timeline-based controls, making it easy to trim, cut, crop, and split videos in all the mainstream formats without losing original quality. Whether you're a beginner or an advanced user, its streamlined interface lets you precisely remove unwanted sections from start to end or any middle part and seamlessly merge the remaining clips for smooth playback, no matter the video length. Plus, FlexClip puts you in full command of your exports: customize frame rate, resolution, and output quality to perfectly match your needs in just a few clicks.
Furthermore, FlexClip goes far beyond basic trimming! It also supercharges your videos with AI-powered enhancements, a vast media library, professionally-designed templates, and intuitive editing tools. Transform your raw clips into stunning visual stories effortlessly! Ready to unleash your creativity? Follow our guide to get started today!
Click Trim Video Now button to enter the editor page. Under the Media section, upload the video you want to trim from your PC or mobile.
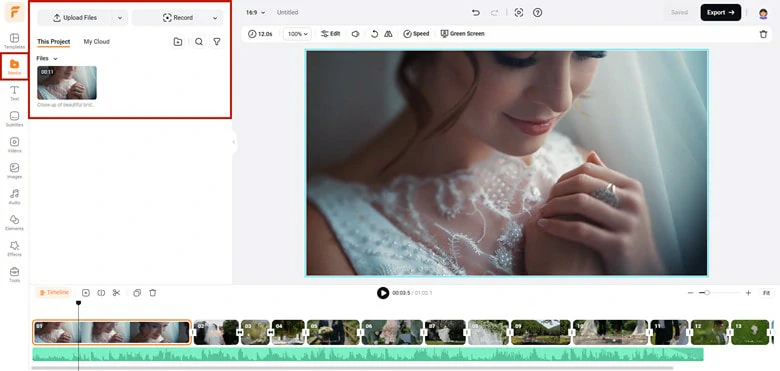
Upload the Video You Want to Trim to FlexClip
Drag and drop the video to the timeline. Then go to the Trim icon at the top-right corner of the screen to enable the trimming feature of FlexClip. Here you can drag the edge towards the center of this video to trim off the beginning or ending part. Alternatively, you can also use Split feature to remove any unwanted parts in your videos.
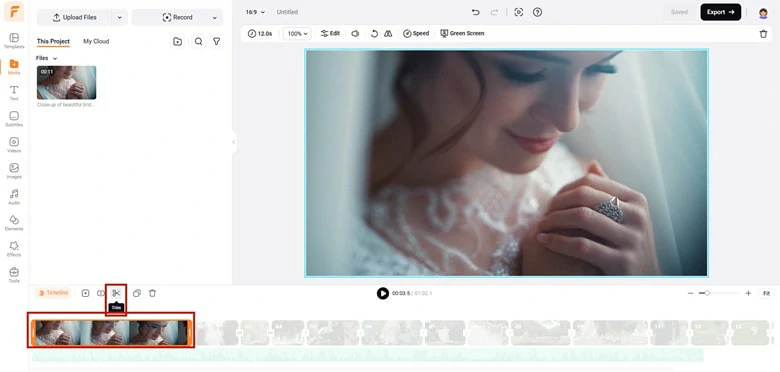
Move the Trimmer Slider to Remove Unwanted Parts from Video
Refine your trimmed clips with more personal touches. Feel free to add text, filter, background music, appealing overlays and more options to perfect your videos. To unlock more creative edits, you can utilize AI-powered tools like TTS for natural-sounding voiceover, AI music generator for one-of-a-kind tune, AI vocal remover for instrumental and acapella extraction, etc. It's no exaggeration to say that FlexClip can bring all your visions into reality,
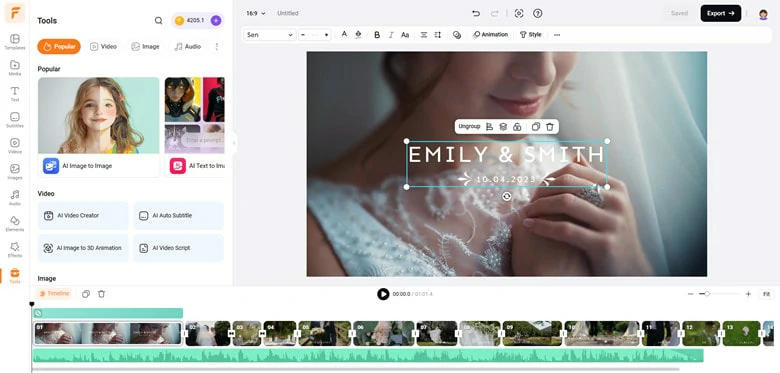
Add Text to Your Trimmed Video
When editing is finished, tap the Export button to save it locally or share it on social media sites.
Frequently Asked Questions
Yes, besides the Photos app, Windows 10 includes (or supports) a few other built-in or Microsoft-provided tools for basic video trimming: Clipchamp(downloadable on Windows 10) and Windows Movie Maker (Discontinued but May Still Work).
FlexClip provides the easiest way to trim, cut, crop and split videos on Windows 10. Simply open FlexClip's editor page with your browser, upload your file to the timeline and trim unwanted part with a few clicks, then just export and download without any quality loss.
The Bottom Line
That's all how to trim video on Windows 10 for free. Follow the tutorial steps to trim unwanted segments from your videos now! By the way, FlexClip is the best option if you're looking for a flexible yet user-friendly trimmer online. Give it a try and let it surprise you!


