We're Bringing New AI Tools to Elevate Your Image Editing

4 Easy Ways to Extract Frames from Video Windows 10

Last Updated: 2023. 03. 31

How do I extract individual frames from video?

How to extract frames from video and save to images?

A video is nothing more than a file that contains a series of frames and displays them one by one. So if there any ways to extract frames from video on Windows 10? Here are 4 available solutions to extract images from your videos. Check this blog to explore it.

Preview
Use This Template
Preview
Use This Template
Preview
Use This Template
Preview
Use This Template

Also Interested: 4 Best Tools to Crop Videos on Windows 10>

Method 1. Take a Screenshot

This method may directly jump to your mind when extracting frames from video on Windows 10. It's simple and straightforward. Here is how you can do it.

Step 1
Play the video in your preferred media player and pause it at the frame you want to capture.
Step 2
Take a screenshot from your video using the Win+Prntscrn on Windows 10. Make sure the media player controls are hidden when you're taking screenshots.
Step 3
This picture will be saved to the Pictures library and you can find it in .png format.
Step 4
Now you can crop or edit it further with Photos if needed.

Note: You can also use third-party screen capture to extract frames from your video on Windows 10.

Method 2. Use Movies & TV Application

If you want to avoid taking screenshots, you can rely on the default application Movies & TV application. Follow the steps below to know how to extract frames from your videos on Windows 10.
Step 1
Open the video that you wish to extract frames from in Movies & TV app.
Step 2
Move to the section you want to capture an image of and pause this video.
Step 3
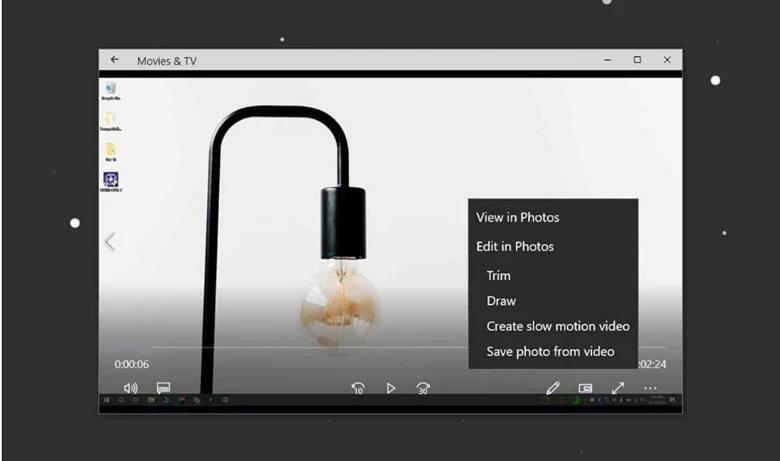
Click on the Edit icon at the bottom of your screen and choose the Save photo from video option.
Use Movie & TV to Extract Frames from Video Windows 10

Use Movie & TV to Extract Frames from Video Windows 10

Step 4
You'll be prompted to the Photos app where you can use the arrows to go forward or backward frame by frame. When you're ready, tap on the Save a photo button to get a snapshot.

Method 3. Turn to VLC Media Player for Help

VLC is a well-known media player compatible with a variety of video formats. What's more, it can also be a free solution for extracting frames from videos on Windows 10. Follow the instructions to do the same.

Note: Before you use this app to extract video frames, it's better to trim or split your video to the exact part you want to edit. Otherwise, it will take a long time for VLC to find the frame.
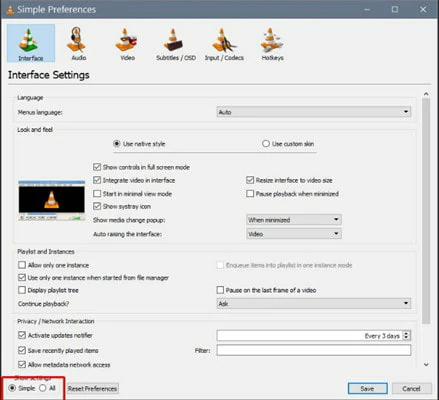
Step 1
Create a file where your frames should be saved. After that, open VLC media player with admin rights.
Step 2
Go to Tools > Preferences > Select All option at the bottom. This will expand the Preferences windows and you'll get various options.
Go to Preference Panel

Go to Preference Panel

Step 3
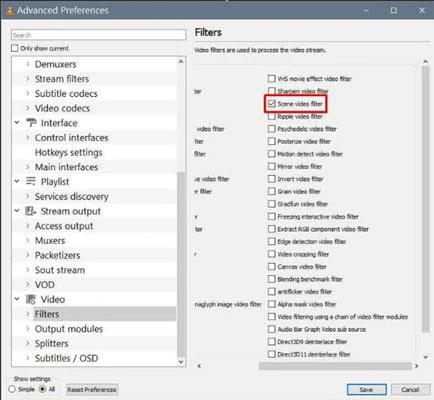
Scroll down to find Filters and click it to choose Scene video filter, then save your settings.
Find the Filters Panel

Find the Filters Panel

Step 4
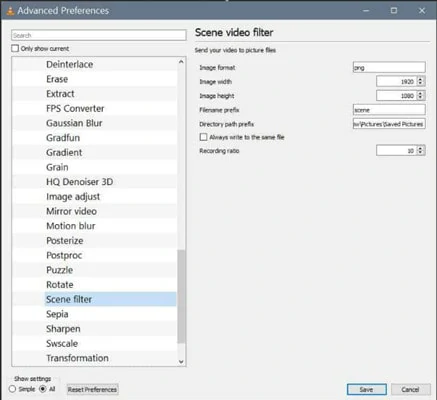
Now expand the Filters menu and select Scene Filter. In the Directory path prefix type the folder path you've already created to save the frames.
Make Settings of Your Video

Make Settings of Your Video

Step 5
Here you can change the Recording ratio. By default, it's set to 50. When it's over, click on Save and exit VLC player.
Step 6
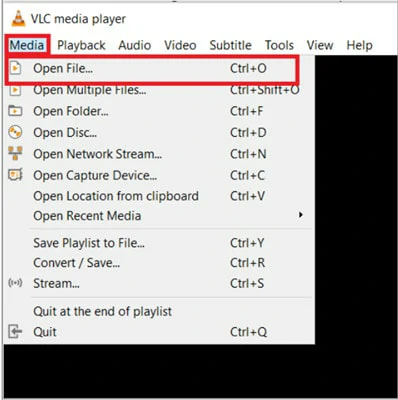
It's time to extract frames from your video now! Go to Media > Open File > Select your desired video and let it play to the end.
Open Video to Extract Frames

Open Video to Extract Frames

Step 7
Once the video completes, open the folder to check all the extracted frames. If there’s nothing in the folder, it’s time to start experimenting with the Recording ratio.
Check Your Frame Images

Check Your Frame Images

Method 4. Use the Photos App

Photos comes to every computer running Windows 10 system. It's packed with the features like crop, resizing and editing on photos. Moreover, it also has the ability to help you extract frames from video. Check the steps right now.

Step 1
Open your video with the Photos app and play this video.
Step 2
Find the frame you want to capture and click on Edit and Create.
Step 3
From the drop-down menu, tap on Save Photos to get saved as a living picture in a few seconds.
Step 4
Open the living picture again using the Photos app and use the arrows to go forward or backward frame by frame. Now you've got the desired frame.

Bonus Tips: The Best Free Video Editor Online

If you're looking for a tool to turn your images into a fantastic slideshow or make advanced edits with ease, FlexClip is a trustworthy video editor you can rely on.

Packed with 4000+ ready-made templates, it lets you create stunning videos in minutes for different themes. Moreover, you can access millions of rich media resources and handy editing tools to perfect your videos. No editing experience needed! No download is required!

Create a Video View Templates

Feature highlights of FlexClip:

  • 4000+ designer-made templates
  • AI-based tools like AI subtitle generator for you
  • Crop, trim and resize your video
  • Millions of royalty-free media resources
  • Professional transitions and overlays
  • Animations and transitions are available
  • Free, easy and simple for all video avid
  • The Bottom Line

    That's all for how to extract frames from video on Windows 10. Pick your favorite way and start to save your images right now.

    Group 11
    Make a free video online
    Create Your First Video With FlexClip Now
    Get Started - Free