If you often use your iPhone’s Voice Memos to record audio recordings for podcasts, interviews, lectures, vocal music, etc, chances are that you may want to convert voice memo to MP4 with BGM, images, and videos for sharing on YouTube, TikTok, and more.
In this tutorial, we will walk you through the 3 best ways to effortlessly convert voice memo to MP4. So, you can turn your recorded voice memo into compelling MP4 videos with images, clips, motion graphics, and animated text, etc.


Here’s What You Will Learn:
Also, read the 4 best AI podcast script generators.
1. Convert Voice Memo to MP4 by FlexClip Online
Well, if you are always on the go and are new to audio and video editing, then using an easy-to-use and versatile online AI video maker to convert voice memo to MP4 can be the best worry-free solution. In this case, the user-friendly and featured-packed FlexClip AI video maker deserves to be one of your go-to choices.
Seamlessly convert voice memos to captivating MP4 videos by FlexClip online.
With FlexClip, you can:
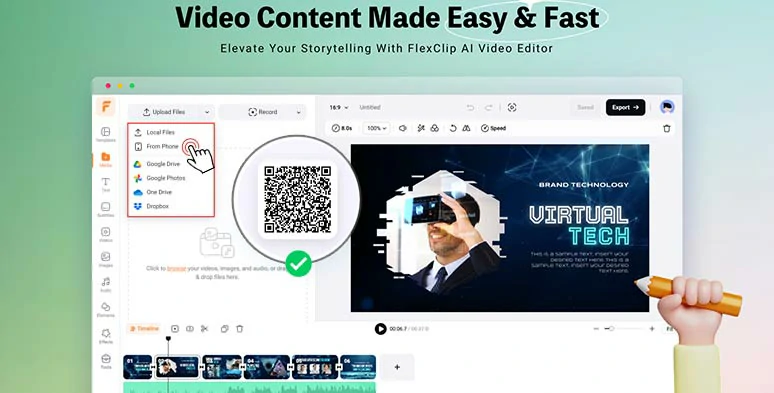
Scan the QR code to upload voice memos on iPhone.
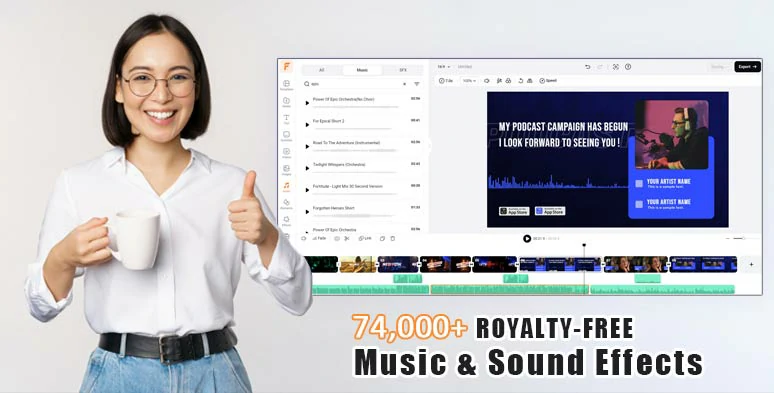
Combine your voice memos with vast royalty-free music and sound effects.
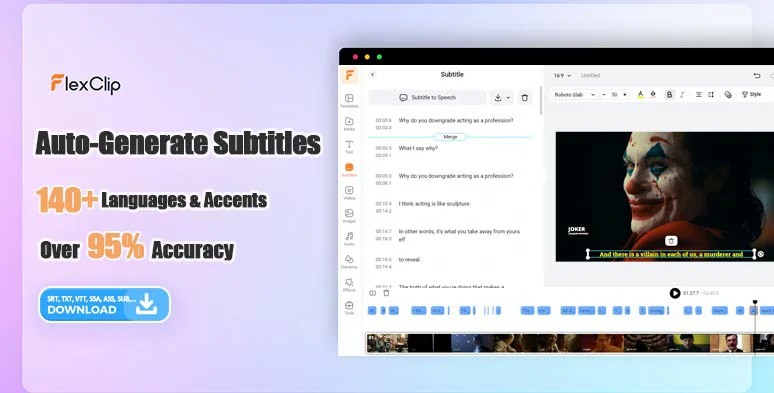
Auto-generate subtitles for your combined voice memos in one click.




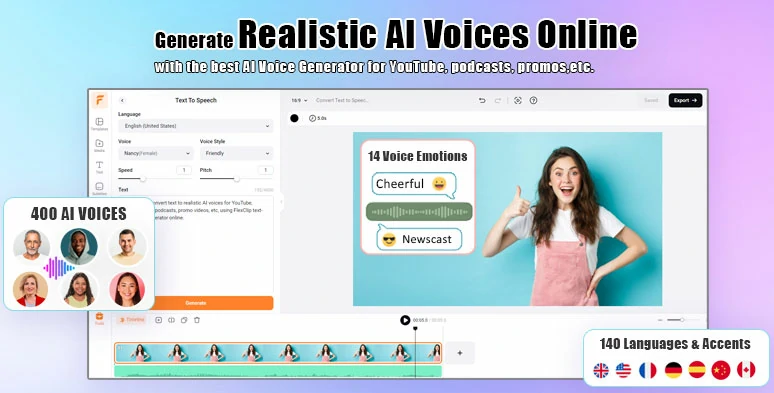
Effortlessly convert text to speech for your video project.
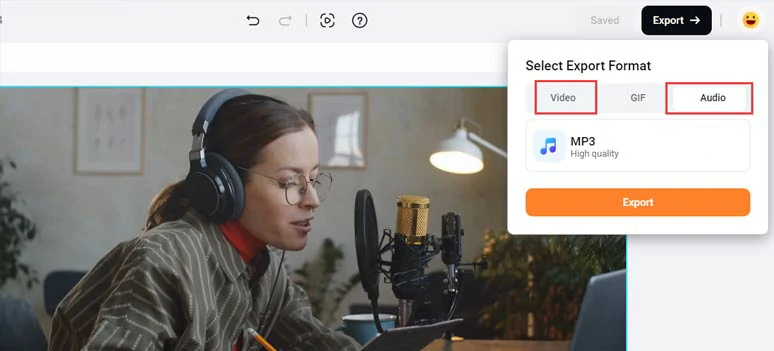
Save your edited voice memos in MP4 or MP3 formats for different needs.
So, now please walk with me to convert voice memo to MP4 using FlexClip online.
Open your Voice Memos app on iPhone > All Recordings > tap the Edit button on the top right corner > select the voice memos needed > tap the share button > scroll down to select “Save to Files”.
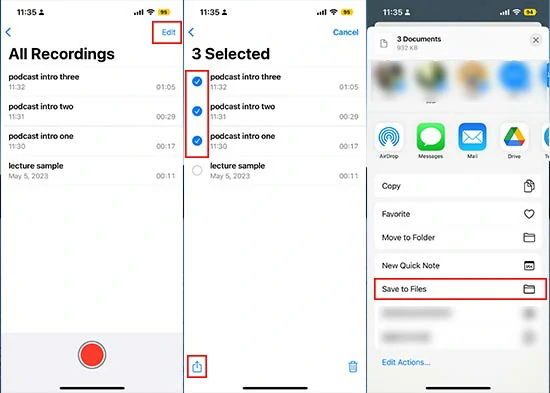
Move voice memo recordings to the files folder on your iPhone.
Access FlexClip > click the drop-down menu of upload files > select from phone > scan the QR code > upload your voice memos from your iPhone’s files folder.
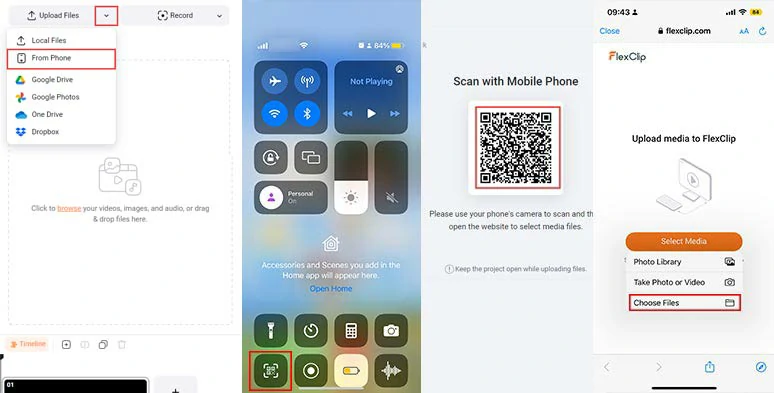
Upload your voice memo recordings to FlexClip from your iPhone.
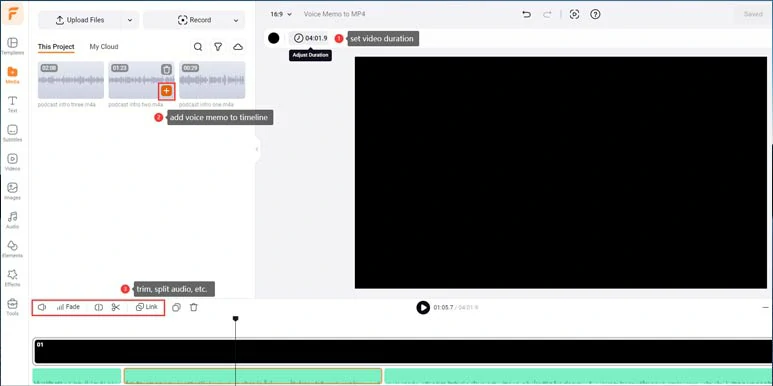
Set video duration and add all voice memos to the timeline for edits.
You can upload other images, clips, and audio from your PC, Google Drive, One Drive, or Google Photos or use royalty-free and high-quality images and videos in the Videos and Images tab.
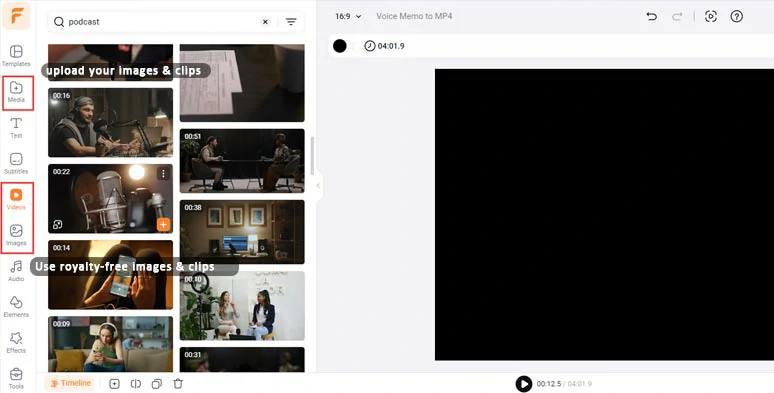
Upload your images and clips or use royalty-free video assets in FlexCilp.
Click the Media tab > hover over to the left corner of the images and videos > click “Add as Layer” to layer as many images and videos you need over the black screen > drag and drop to make the image/video fill the screen side by side or create image or video collage to your liking.
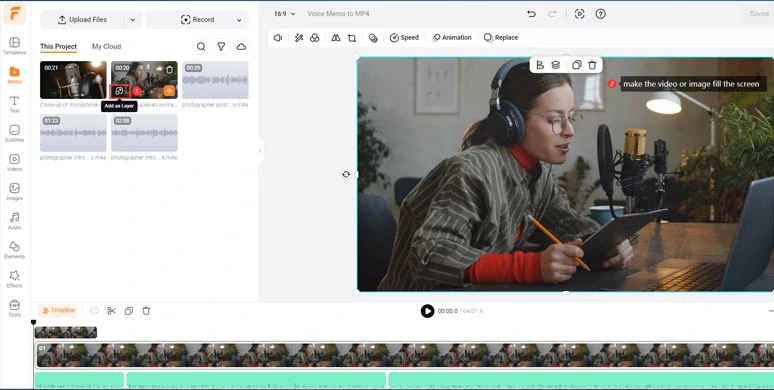
Layer images and videos to create engaging visuals for the voice memos.
BTW, you can click the Timeline icon to fine-tune the sequence and duration of image and video overlays and other elements as well.
Click the timeline icon to adjust each overlay element.
To make your converted MP4 video accessible to all viewers, it’s advisable to add captions or burned-in subtitles to it. With FlexClip’s AI auto subtitle generator, you can do it in one click, with over 95% accuracy.
Click the Subtitles tab > Auto AI Subtitle > identify the language of your voice memos > hit Next > select the style of subtitle, which can be changed later > press the Generate button.
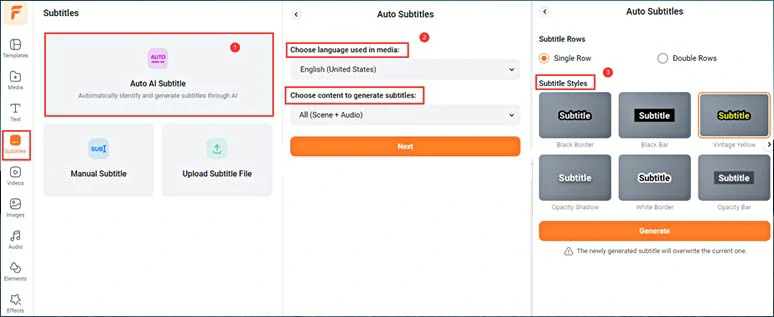
Auto-transcribe voice memo to text for subtitles in the MP4 video.
Now, you can proofread the auto-generated subtitles > correct any misspellings > tweak the style of subtitles, such as text font, text color, text size, alignment, color and opacity of background fill, italics, boldness, etc.
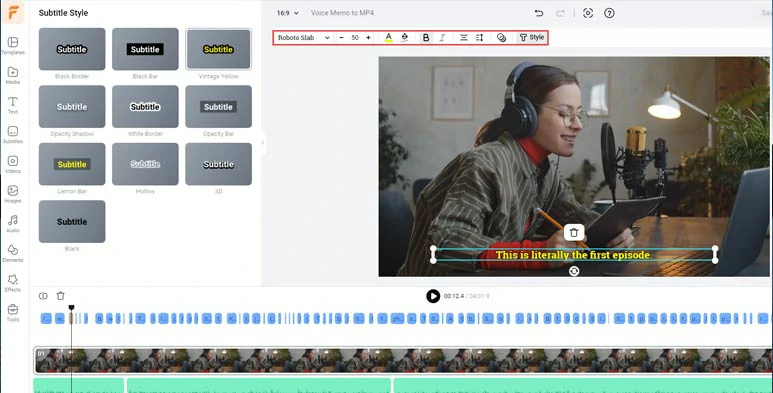
Customize the style of auto-generated subtitles.
Alternatively, you can click the download button to save the voice memo transcript in SRT, TXT, SUB, VTT, SSA, ASS, SBV, or CSV formats for your blog posts, news releases, translations, closed captions or other repurposings. What a great time saver!
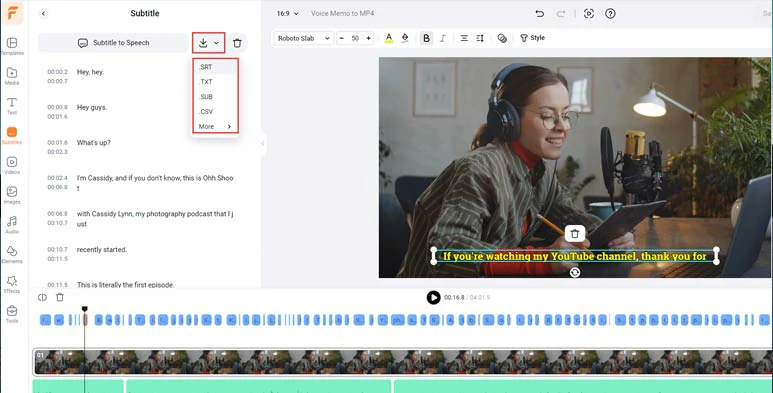
Download voice memo transcript in SRT, TXT, and other formats for repurposings.
Click the Audio tab where you can select royalty-free and studio-like music to bring your voice memo to life or add ambient sound effects to evoke emotions from viewers. A small trick is to layer multiple audio tracks to create depth and a real-world auditory experience.
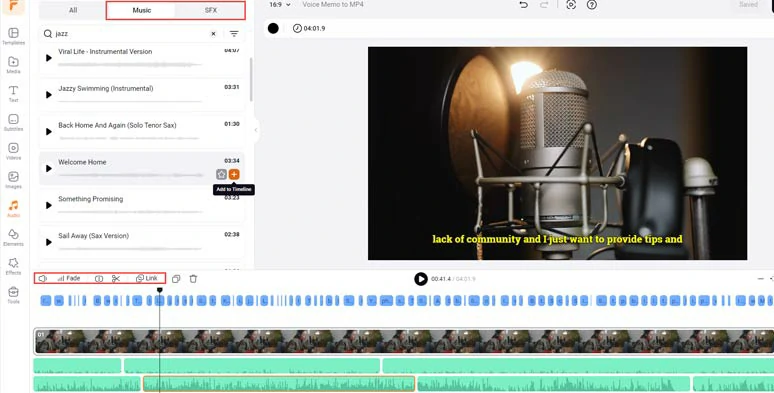
Add upbeat music and sound effects to create the vibes.
Next, click the Text tab > select from 1,000+ readymade and editable text animations for video titles, and call-to-cations, such as YouTube/TikTok/IG Reels’ like, share, and subscribe button, speech bubbles, call-out titles, news titles, profile titles, search bars, location titles, quote titles, etc. Please feel feel to explore.
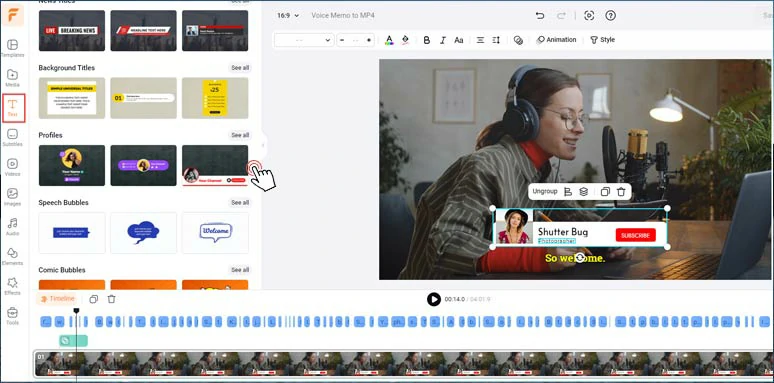
Add editable text animations for call-to-actions in your video.
You can drag and drop to replace your profile image/video, stylize your text or animate the text with styles, such as typewriter, cinematic glitter, blur, burst, bounce, fade, neon, etc.
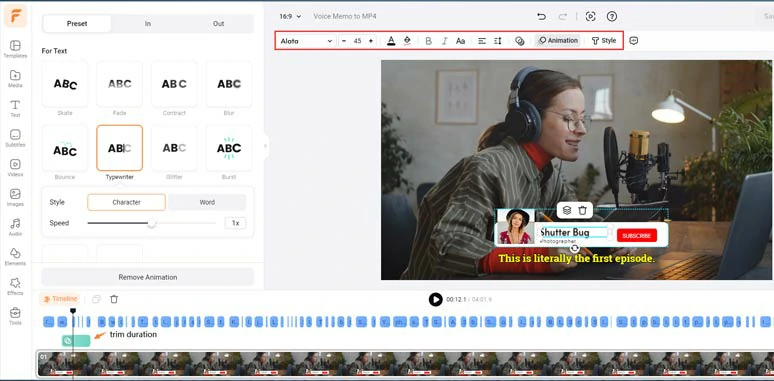
Customize the style and animation of text.
By clicking the Effects tab, you can select from 400+ creative overlays, like cinematic bokeh, light leaks, ink splash, falling petals, snow, fire, etc. to add a cinematic touch to your MP4 video. Do give it a shot.
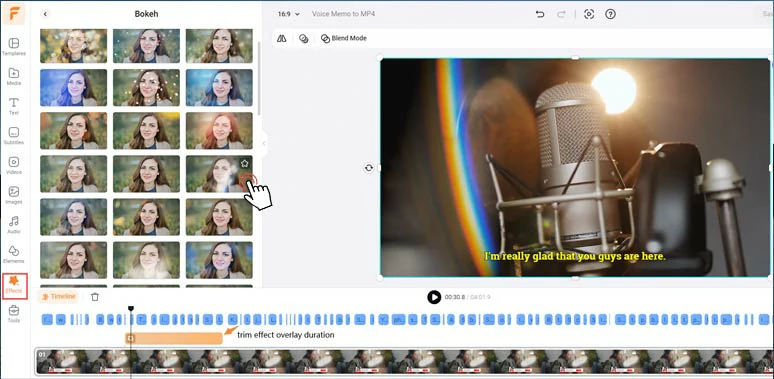
Add cinematic bokeh effects overlays to your video.
Done with the editing. You can click the Export button to save the edited voice memo in 1080P MP4 format to your computer or directly share it to YouTube, Googe Drive, One Drive, Dropbox, or even TikTok; a clickable link is also available for a private share, your blog posts, newsletters or other repurposings. You can even save the whole project in an MP3 audio file for free for your podcasts. Super helpful!
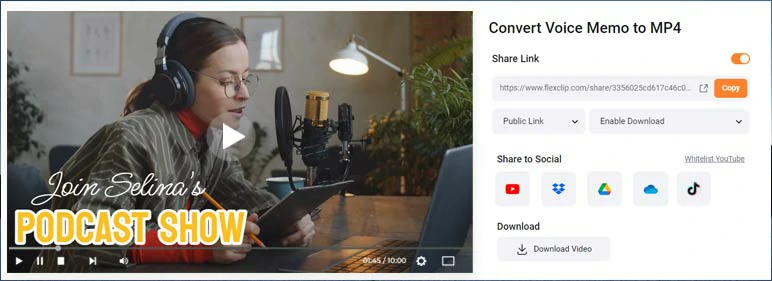
Easily share and repurpose your video content.
2. Convert Voice Memo to MP4 by iMovie
The second free and easy way to convert voice memo to MP4 is using the pre-installed iMovie video editor on your iPhone. Of course, it’s available on Macbook, iMac, and iPad as well.
Open the iMovie on your iPhone > tap Start New Project > Movie > Media > tap either the Video or Photos tab to select images and videos needed > tap Create Movie. You can tap and hold to adjust the sequence of imported images and videos.
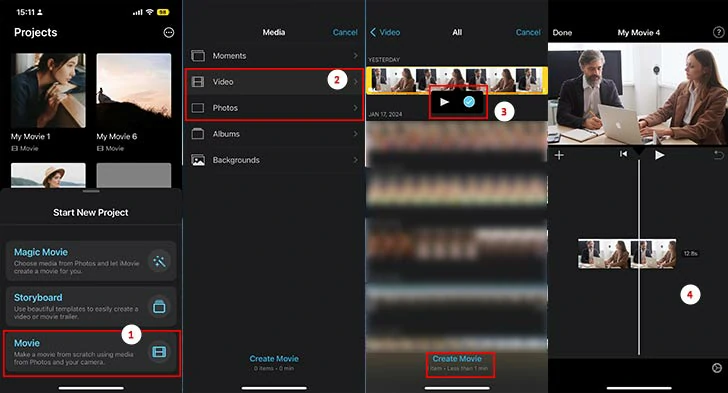
Create a new project in iMovie and add videos and images.
Tap the Plus sign > scroll down to find Files > select the voice memo recordings needed to add to the audio tracks. You can select the voice memo > tap split to cut voice memos into two or trim the unwanted parts.
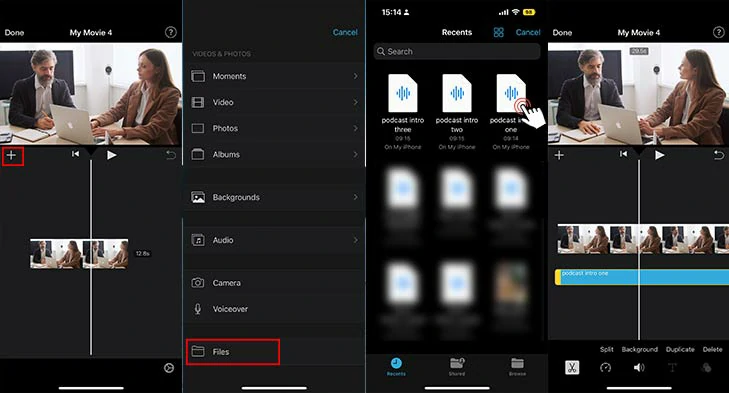
Add voice memos to iMovie.
Tap the Plus sign > Audio > Soundtracks > you can add free music for BGM of your voice memo. Or tap the image or video > tap T icon to add basic animated text or select from 5 transitions for your video.
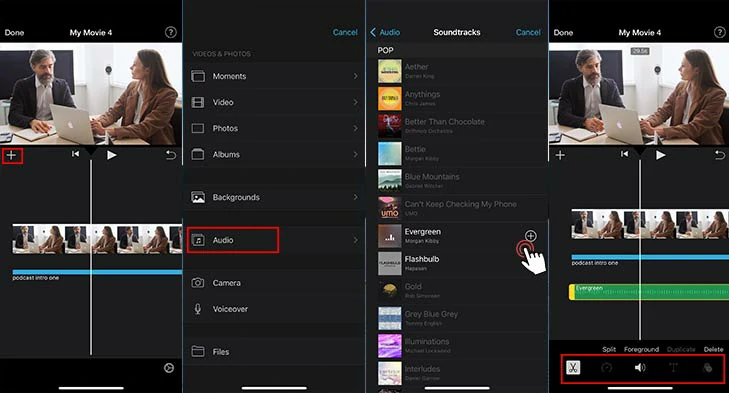
Add free music, text, and transitions to voice memos in the video in iMovie.
Done with the editing. Click the Done button > Share > save the edited voice memos as an MP4 video file to your camera roll.
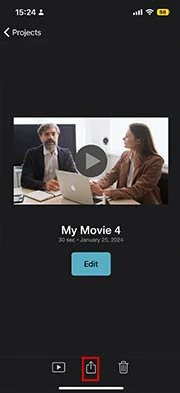
Save the MP4 video to the camera roll on the iPhone.
The only downside of using iMovie to convert voice memo to MP4 is that iMovie will auto-crop the imported vertical images and videos to a 1:1 video aspect ratio, which is quite annoying. Besides, the text animations, transitions, and free music are so limited.
3. Convert Voice Memo to MP4 by CapCut
Last, but certainly not least, another great workaround to convert voice memo to MP4 is using CapCut, a free and powerful video editor, available for iPhone, Mac, Android, and PC users.
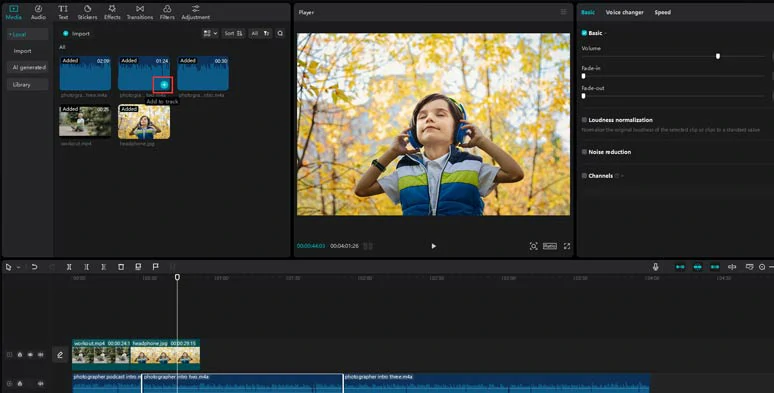
Add voice memos, images, and videos to the timeline by CapCut.
Click the Audio to download some free music and sound effects for your voice memos or click the Text and Effects tab to add video titles and other cool effects to spice up your video.
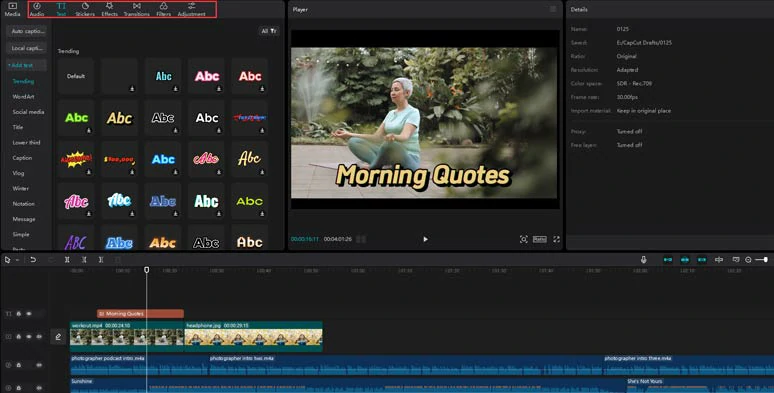
Jazz up voice memos with music, animated text and more effects.
Once you are satisfied with the final result, click the Export button to export the edited voice memos in MP4 format to your computer. Besides, CapCut also supports MP3, WAV, and ACC audio export.
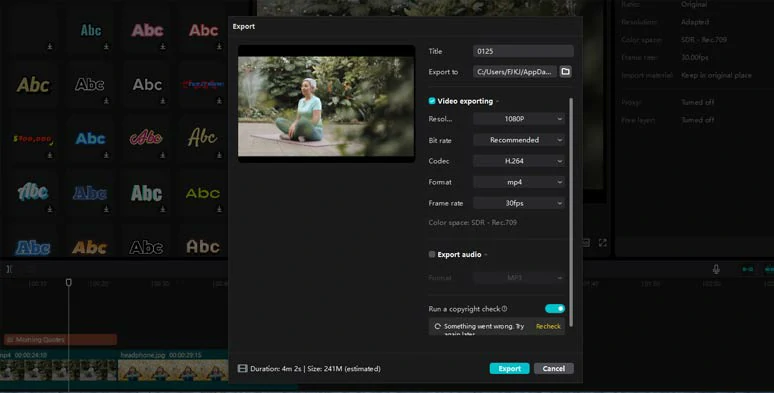
Export the MP4 video from CapCut.
Well the only drawback of using CapCut to convert voice memo to MP4 is that the maximum video length for video export is 15 min. So, it works better for creating short video content.
Now, It’s Your Move
In a nutshell, converting voice memo to MP4 offers you the flexibility to combine voice memos with music, sound effects, images, videos text animations, etc., and enhances the sharability of your voice memos across diverse social media. So, please try out all three voice memo to MP4 converters and drop us a comment on Facebook or X (Twitter) to let us know which one works best for you. Cheers!


