The pause effect is an editing feature that stops the moving image of the video and holds it still onscreen. With a simple pause effect, you are able to pause on a specific frame in a video to emphasize the moment or provide more context to the audience, drawing viewers' attention in. This video editing feature is often used for tutorials, vlogs and more.
Though it looks pretty professional, in this tutorial you will know to add pause effect in videos is much easier than you thought. Let’s start!
Part 1 How to Add Pause Effect to Video in Premiere Pro
If you plan to add pause effect to video, using Adobe Premiere Pro can give your video a more professional look. Premiere Pro can maximize your editing potential on how to add pause effect to video. Premiere Pro offers several methods to achieve a pause effect, each providing unique benefits and flexibility in your editing process. You can choose the method that works best for you to add pause effect according to your needs.
However, the downside of Adobe Premiere Pro is that it only has a free trial version for seven days. You must download it from the official Adobe website. After the trial period, you will need to purchase a subscription to continue using the software.
And you can learn how to add pause effect in Adobe Premiere Pro through this video tutorial below.
Part 2 How to Add Pause Effect to Video in Premiere Pro’s Alternative - FlexClip
FlexClip’s clean interface and simple operation allows you to add a pause effect is as easy as clicking and dragging. FlexClip has a feature that automatically generate pause effect for you in click of a button. If you want to increase your own creativity and pause time by adding pause effect to video, you can do so and more with FlexClip.
Full control of pause effect in the video: FlexClip’s accurate timeline empowers you to pinpoint the exact moment for you to pause the effect. You can effortlessly position the playhead using the mouse or make precise adjustments with the arrow keys. Besides, once you’ve added the pause effect, you can easily customize its duration by dragging with the mouse button.
Provide more editing feature to enhance your video with pause effect: FlexClip also provides more editing techniques to enhance the pause effect in video. It allows you to apply effects, such as zooming or panning, to create visual movement and highlight details. And its color correction and filters allows you to change the color palette and create a special atmosphere for your video.
Can share video with pause effect to social media directly: FlexClip enables you to adjust your video’s aspect ratio seamlessly to cater to various platforms. Moreover, after completing your edits, you can promptly publish your videos with pause effect on platforms like YouTube and TikTok for swift sharing.
How to Add Pause Effect to Video in FlexClip
Tap the Media to upload video clips from your phone, PC, Google Drive, One Drive, Dropbox, or Google Photos and apply them to the timeline directly.
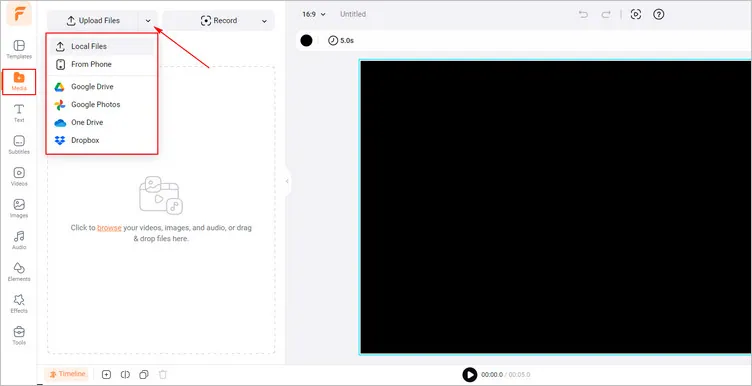
Upload Your Own Video Materials - FlexClip
Or you can use clips from FlexClip’s abundant video library to inspire you.
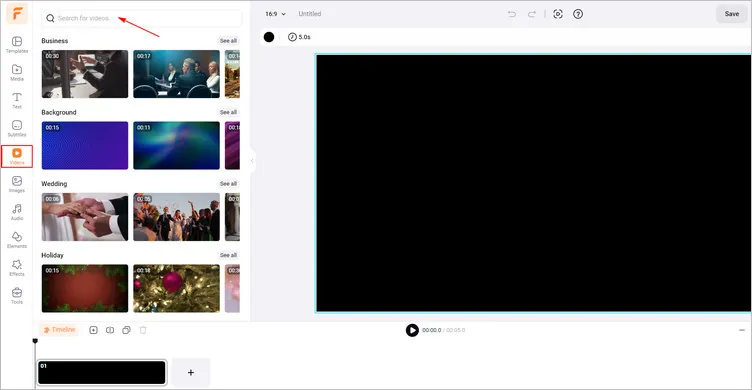
Use Video Library - FlexClip
Once you’ve dragged your video materials to the timeline, you can move the playhead in the timeline to choose the specific frame you wish to add a pause effect. Then right-click on the clip and select "Freeze Frame" to add pause effect to your video.
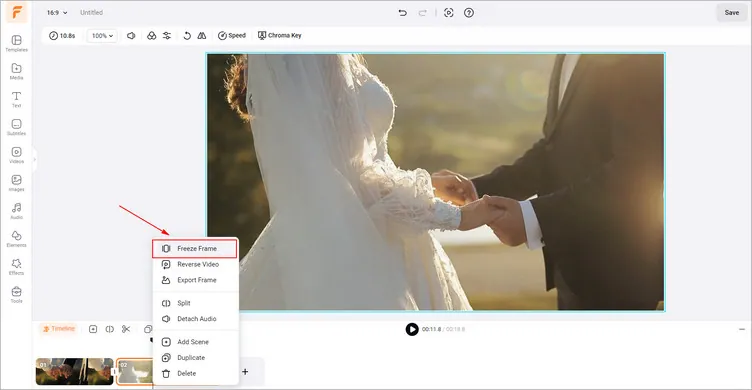
Add Pause Effect to Your Video - FlexClip
If you’re finished all edits on your video, please hit the Export button to download your video with pause effect in clicks and you can share it to social channels directly, like Tik Tik or YouTube.
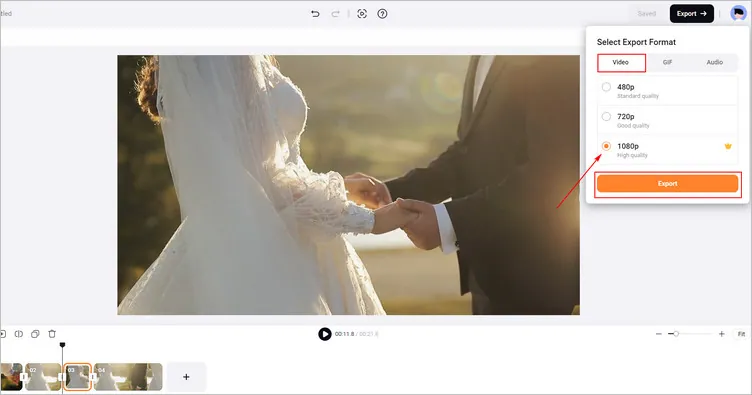
Download Your Generated Video with Pause Effect - FlexClip
The Bottom Line
That’s all for how to add pause effect in Premiere Pro and its alternative - FlexClip. Just pick your favorite way and start to create your pause effect video. By the way, remember to give FlexClip a try if you prefer more flexibility in editing.


