Lens Flare is a photographic phenomenon in which bright light enters the camera lens and scatters. It can also be regarded as a natural response for bright light like sun, moon, or artificial lighting appearing in the photo or video in a haze or a starburst. This trick is usually used by many video creators to add a touch of realism and heighten artistic look.
However, it is just hard to have perfect light while filming. Under this circumstance, video creators choose to add lens flare effect to video which is most video editors can help with.
Lens Flare Example
Premiere Pro is a professional tool to add all sorts of visual effects to your video, including the lens flare effect. Even though it has only one lens flare effect, you can make lots of edits on the effect like adding animations, keyframe to make the effect look great on the video. Now, follow the steps below to add lens flare effect to video with Premiere Pro.
Can't Miss: How to Stop Instagram Autoplay >
How to Add Sun Flare Overlay to Video in Premiere Pro CC
Go to adobe.com/products/premiere, download Premiere Pro CC to your computer. You might need to upgrade to add lens flare to video. The price is $20.99/month.
Upload your video to the Project panel and drag to the timeline.
Go to the Effects next to the Project panel, select Video Effects > Generate > Lens Flare. Once selected, a lens flare will be added above your clips.
There are loads of edits you can make on the lens flare. The first thing you can do is dragging to move the lens flare so that it appears in the right place.
Go to Effects Control > Lens Flare. There are four options, the first two are Flare Center and Flare Brightness. Flare Center is used to animate the lens flare and the Flare Brightness is to control the brightness. Here is how we suggest to use the two options.
Drag the slider to where the video begins. Adjust the Flare Brightness to 0% so that the sunlight overlay appears to be very dim. Move forward a couple of frames and then change the brightness to 30%, then again, move a couple of frames more, change the brightness to 100%. Play the video, you will notice that the lens flare appears to be brighter and brighter.
It is time to animate the Lens Flare. Click on the second icon sharped as a rhombus in the Flare Center. Move the slider a little bit, and select the destination where you want the Lens Flare to move to. Now, you have a pretty good video with the Lens Flare moving slowly.
An Easier Way to Add Sun Flare Overlay to Video
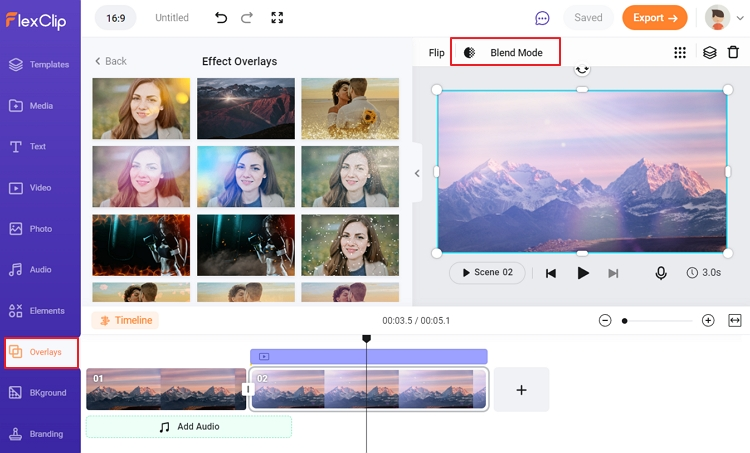
Using Adobe Premiere Pro CC does allow you to create excellent videos with Lens Flare. Yet, most people complain about the complicated process and expensive subscription price. As a matter of fact, there are more high cost-effective tools. Here we recommend FlexClip, a much easier to use tools with lots of sun flare overlays for you to choose.
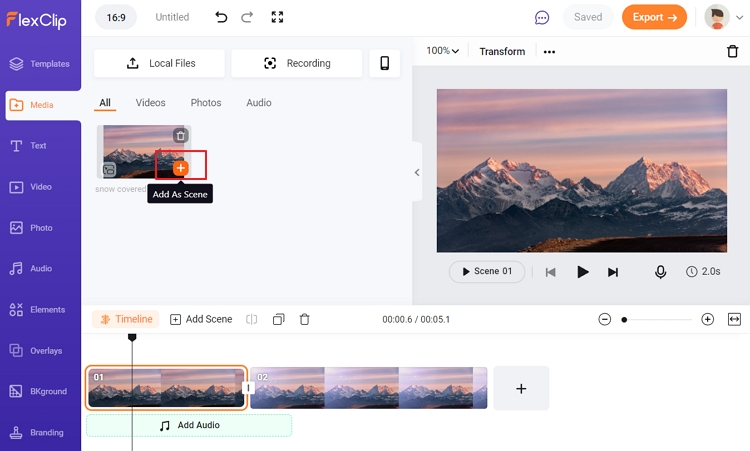
Click on the Create a Video button and follow the steps below. You are also welcomed to browse FlexClip’s various templates.

Add Lens Flare Effect to Video - Apply to Storyboard

Add Lens Flare Effect to Video
The Bottom Line
Lens Flare effect is essential to create dreamy atmosphere for the video. Premiere Pro CC and FlexClip can all help out. While Premiere Pro CC is powerful and helps achieve the best results, it is complicated and expensive to use. FlexClip is an online tool with high cost-performance. Lots of Lens Flare overlays are available, and no complicated process involved. Give it a try!


