Most cameras are easy to catch on. Squeeze the shutter button, the best moment is captured. There is no wrong to use camera like this. Anyway, many photo editing tools are available. For ambitions photography lovers like you, the goals should be adjusting camera settings - shutter speed, ISO, aperture, and taking a photo without any post-processing involved.
To make a video with high quality, it is better to add voice over to the video after shooting, because the sound quality on any camera is usually underwhelming. Even though you are just making a video without narration, adding music can make the video more interesting.
Adjusting camera settings for a nice shooting is not a hard task. Take this blog as a starting point: basic knowledge of setting up cameras. Check it out.
Also Read: Lighting Tips You Have to Know While Filming >
How to Adjust Camera Settings
Before getting started, remember, there is no versatile index to refer to. The best camera settings should very depend on what you are shooting and the light conditions.
Part 1. Automatic Mode, Manual Mode or Other Modes?
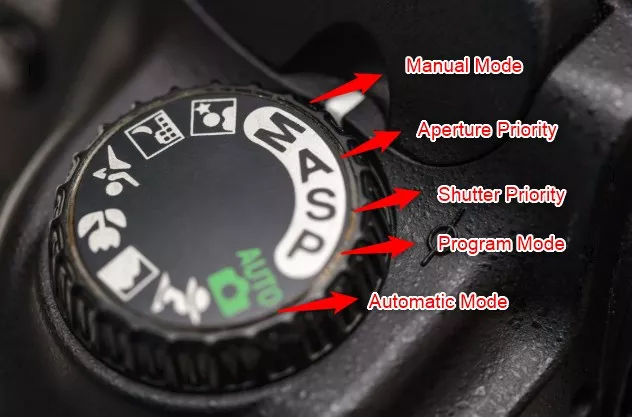
The automatic mode means camera's full control over all aspects in shooting from shutter speed, aperture settings to focus. For some older cameras, this mode is the only option. While using automatic mode is not challenging enough for your shooting skills, it can be a better choice when you are in big hurry or working in good light conditions.
The program mode is quite similar to the automatic mode. It is a specific function in digital cameras. You have to set up the white balance type, focus mode, etc. in advance.
On the contrary, the camera manual mode allows the photographer to determine the image exposure. Generally speaking, when in tough or changeable lighting conditions, photographers do better in exposure.
More people turn their eyes to semi-automatic modes called shutter priority (TV) and aperture priority (AV). The two modes give users control of either aperture or shutter speed and letting the camera determine the rest of the settings.

Image Board: How to Adjust Camera Settings - Camera Mode
Part 2. How to Set Up Shutter Speed/Aperture/ISO/White Balance
In order to adjust shutter speed, aperture, ISO and white balance freely, please set the dial on your camera to Manual Mode in advance.
> Adjust Shutter Speed
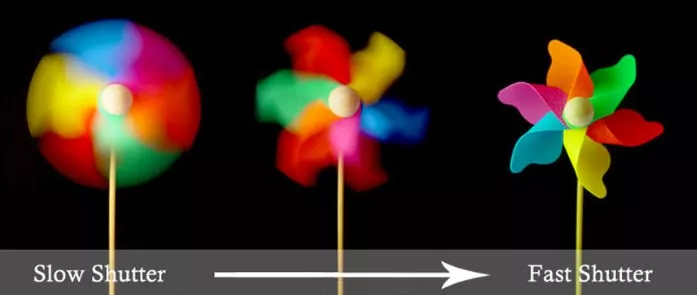
Generally speaking, you can set shutter speed as 1/200 second, 1/60 second, 1/10 second. The slower the shutter speed, the more light is allowed into the camera. Providing that the shutter speed is too fast, the picture might be too dark. If the shutter speed is too slow, the picture would be blurry.

Image Credit: craftfilmschool.com
Tips To minimize blurriness caused by shaking, do use a tripod.
> Adjust Aperture
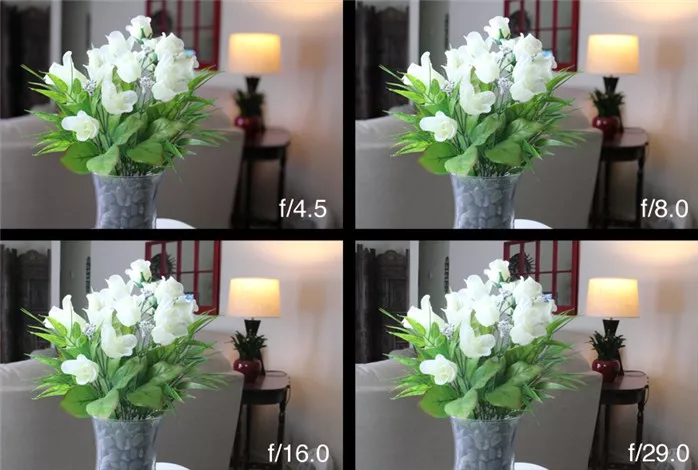
Each camera is equipped with an aperture in front of the lens. The aperture opens and closes to let light enter into the camera. The diameter of the aperture is called f-stop.
The following pictures are taken under f-stop of 4.5, 8, 16, 29 respectively.

Image Credit: deanchines.com
It is not hard to notice that the photo is in most focus when the f-stop is in 29, while the photo is in minimal focus when the f-stop is in 4.5.
That is not to say the higher f-stop is, the better it is. Higher f-stop setting requires longer exposure, increasing the chance of photos getting blurry.
> Adjust ISO
ISO value measures the camera's sensitivity to light. It is recommend to keep ISO at the lowest. Alike aperture, high ISO values increase shutter speed and lead to grainy pictures.
> White Balance
White balance affects the color of photo. Leave it as it is. Yet, it does no harm to adjust it to achieve certain effects. Give all white balance settings a try in advance.
The Bottom Line
In a word, four modes and four factors contribute to the quality of the photo. Each of camera settings depend on the lighting, camera model. We recommend you refer to the manuals and practice a few times to figure out the best proper settings.


