The way that a scene ends and a new scene emerges on the screen can have quite a drastic impact on the audience or the viewers. The intensity with which a scene changes or how smoothly the transition takes the viewers to the next part of the video is extremely important to keep your audience engaged and entertained.
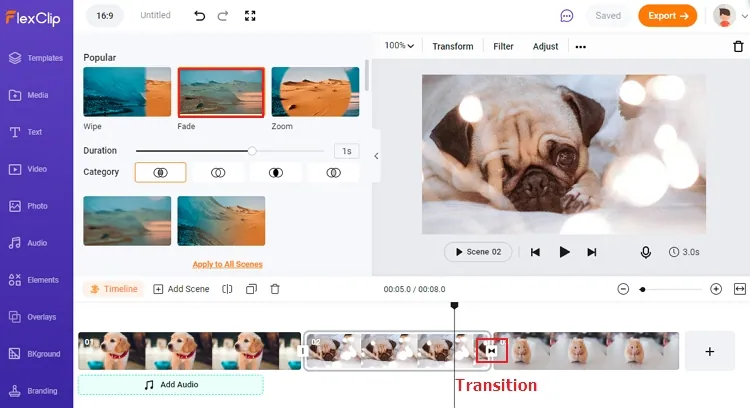
To create this dramatic effect, fade effects are used at various intervals of the video I.e. at the start, end, or whenever a scene changes. Fade-in and fade-out effects also look incredible when used in a short video or a promotional campaign that you have created by arranging several different pictures together.
Desperately in need of a great fade effect? Follow this guide and fade image in seconds.
The Easiest Way to Fade Image in Video
Numerous software are available to create fade image effect in your videos. Most like Adobe Premiere are either too complicated to be understood by novice editors or are quite expensive to be benefited by everyone.
Therefore if you need something simpler but equally cool and awesome then you need to try FlexClip, the best video editor online. Being filled with versatile features and elaborate transitionss in one natural intuitive interface, FlexClip is the name professionals trust for all to fade image in video.
Killer Features of FlexClip Transitional Effects
The online tool also supports most of the video formats including MP4, MOV, M4V, WebM and many more.
Quick Tutorial on How to Create Videos Online with FlexClip
How to Fade One Image into Another Online
Let’s learn to use FlexClip to fade one image into another. Now, click on Create a Video to get started.


Don’t have Media Assets? Go to the Photos section and try the existing resources in the editor to kick start your editing projects.
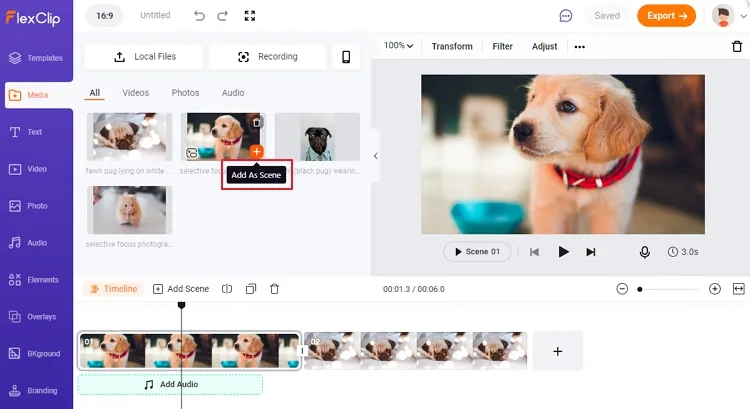
Upload Media Resources from Local Files
Make Further Adjustments to Video
The Bottom Line
In the hustle-bustle of life, you do not need to spend hours and hours on understanding the complex working of video editors which are sure to leave you exhausted in the end. Try the simplest video editor to Fade images online to create flawless effects in your videos. The results created by FlexClip are awesome to leave anyone breathless.
Since you have already learned how to fade Picture into another, you are all ready to create flabbergasted videos for your social media audience. Try creating slideshows, TikTok videos, or Instagram-worthy content to create impactful results never experienced before.


FlexClip Video Maker
The easiest way to help you create custom videos, no design skills needed.
Start Now for Free
Hot & Trending
-

Ultimate Tik Tok Guide – How to Tik Tok & How to Make a Tik Tok Video that Gets Likes
-

Instagram Story Video Quality Bad After Upload? Fix It!
-

7 Best Ways to Find Music in YouTube Videos
-

How to Repost Video on TikTok & How to Remove TikTok Repost
-

Improve Video Quality Online: 3 AI Video Quality Enhancers You Can't Miss
-

4K Convert to HD 1080p without Watermark: Best 4k Video Converters
-

How to Change Face in Video on Phone/Desktop/Online
-

Top 13 Birthday Video Makers with Music and Effects Free