Character introductions (most probably you have seen in movies) have the explicit purpose of introducing audiences to the characters, and they are a prime opportunity to impress your audience and hook them into your story.
Here in this article you can learn how to create such a freeze frame character intro in Premiere Pro to introduce your character in an absolutely epic fashion, highlighting their strength or simply their distinctive character traits.
Contents:


Create Video Faster with FlexClip's Pre-Made Templates →
Start from Scratch Easily with FlexClip’s Online Video Maker →
Can't Miss: How to Make a Realistic Typewriter Effect in Premiere Pro and Online for Your Video >
How To Do Character Intro Freeze Frame Effect in Premiere Pro
Here we'll show you how to create the character introduction freeze effect in Premiere Pro. This effect has been used in many films and is a great way to introduce characters into your videos. We hope this Adobe Premiere Pro tutorial helps take your videos to the next level!
Check the video tutorial below to know more details for Creating Character Intro Freeze Frame Effect in Premiere Pro:
How To Make Freeze Character Intro Animation in Premiere Pro
For a text tutorial? Just read on…
First, let’s launch the Premiere Pro program, import your video and drag it to the timeline. Then find the frame your want to freeze for your character intro.
Create a Freeze Frame Effect for Your Character Intro Screen
Adobe Premiere Pro offers different techniques to make a Freeze Frame effect, such as Insert Frame Hold Segment, Add Frame Hold, or Export Frame.
Here, we’ll try the Export Frame feature to make a freeze frame screen for our character intro, position your playhead at particular frame location that you want to freeze for your character intro, and click the Ctrl+K to make a cut, then click the Export frame button, or you can use the shortcut Shift+E.
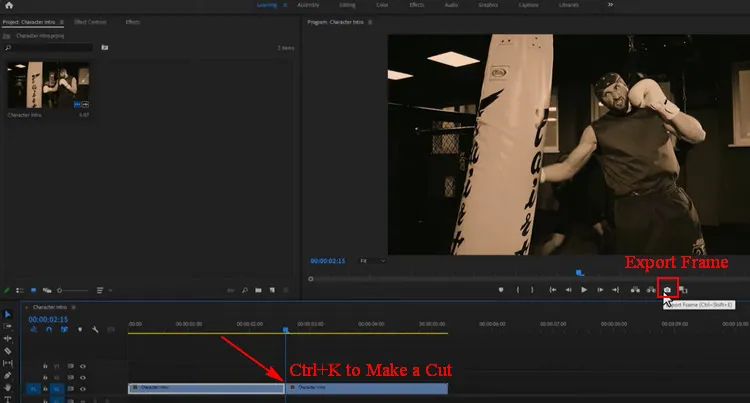
Character Intro Freeze Frame Effect with Premiere Pro - Export Frame for Freeze Effect
It will immediately open an export frame dialogue box on screen where you can change name of the still frame and save it in JPEG or PNG format.
After that, Premiere Pro will create a still image file on disk and reimports it into the project by default, adding a new project item, which you can drag and drop to the timeline for editing as your character intro.
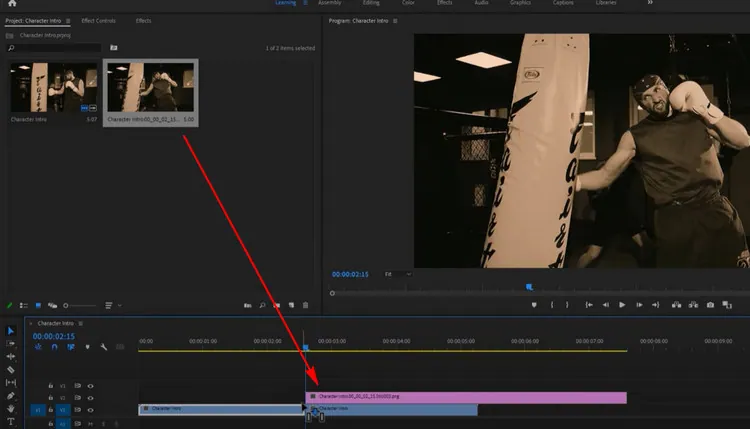
Character Intro Freeze Frame Effect with Premiere Pro - Add Your Freeze Frame
Edit the Freeze Frame to Make Your Character Intro
Set Freeze Frame Duration - Select the freeze frame layer, set the duration that you want to freeze for your character intro, and duplicate it by holding on Alt button and dragging it on the track above.
Mask Your Subject(Character) - Now we'll need to draw a mask around our subject.Select the top freeze frame layer, then move to the Effect Controls tab, find the Opacity and click the pen tool to mask out the entire subject on the frame. Here, remember to zoom in the clip for a quick and precise masking.
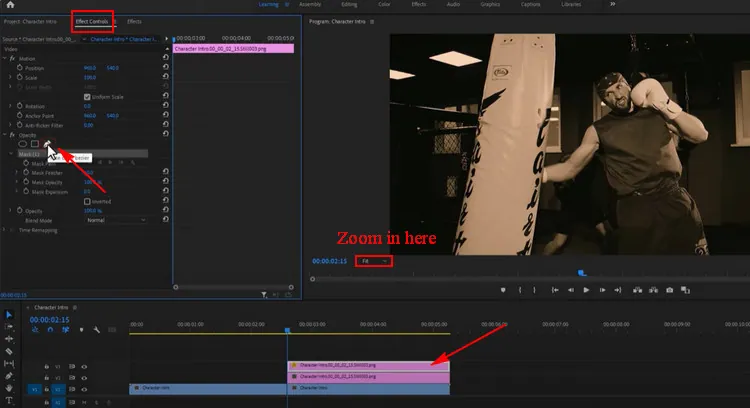
Character Intro Freeze Frame Effect with Premiere Pro - Mask Your Subject(Character)
Once done the masking, change the program windows back to fit, and then change the Mask Feather from 10 to 0.
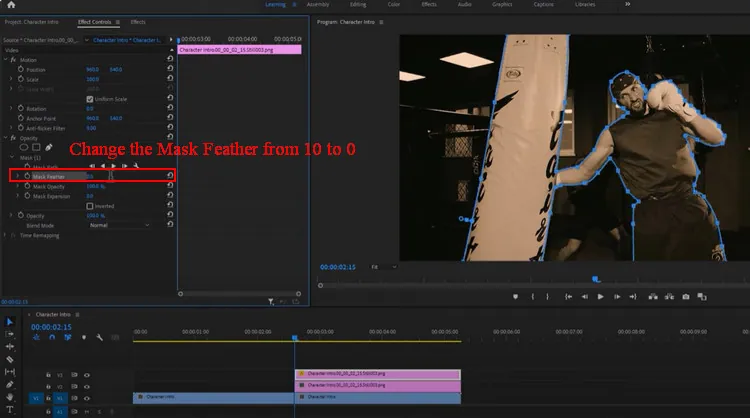
Character Intro Freeze Frame Effect with Premiere Pro - Change the Mask Feather
Blur the Background - Now, let's handle the background of freeze frame screen, here we’d like to make it a bit blurry. Simply select the bottom freeze frame layer, go to the Effects tab and search for gaussian blur, and apply it to the layer. Then go back to the Effect Controls and change the blurriness around 50 and enable Repeat Edge Pixels.
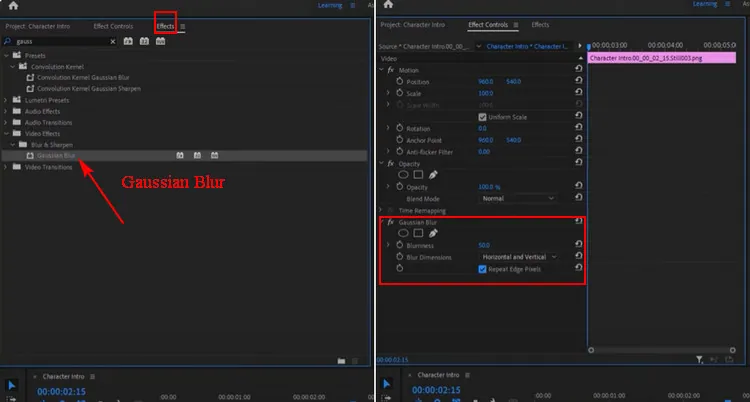
Character Intro Freeze Frame Effect with Premiere Pro - Gaussian Blur
Animate the Subject(Character) - It's time to add animation to the subject on your freeze character intro. Select the top layer, and make keyframes on the position and scale under the Motion option to make the object zoom in and zoom out on the screen.
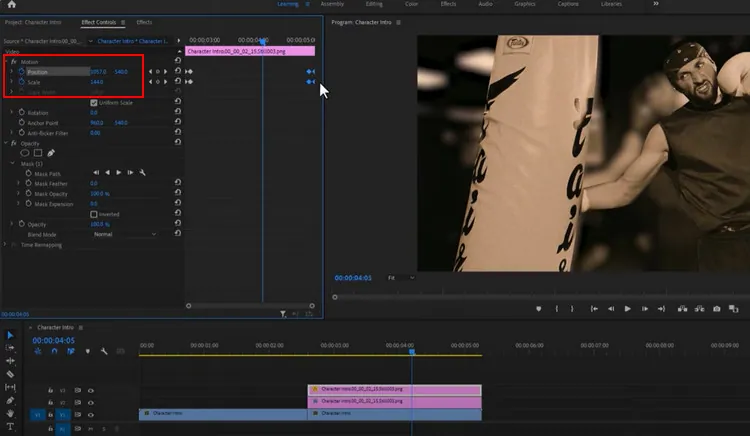
Character Intro Freeze Frame Effect with Premiere Pro - Animate the Subject(Character)
After that, we need to nest the top layer, just right-click the the top layer, and select Nest from the pop menu, and then click OK.
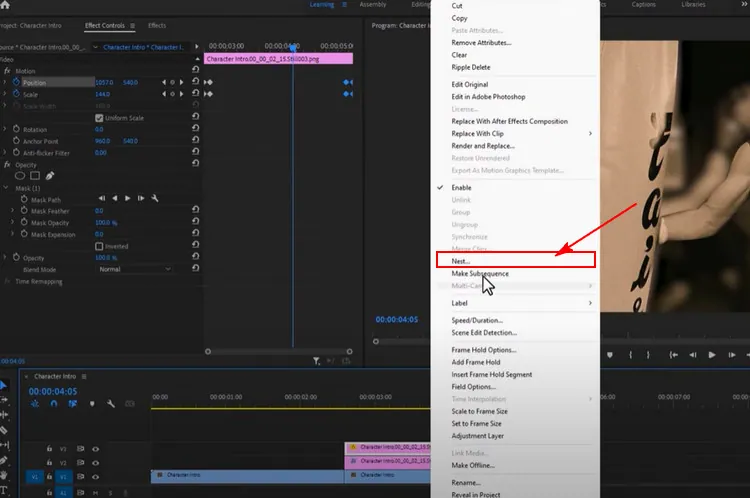
Character Intro Freeze Frame Effect with Premiere Pro - Nest
Outline the Subject(Character) - To make the subject highlighted, we’d like to add a white outline around it, let’s go to the Effects tab, search for radial shadow and apply it to the nested clip. Then go to the Effect Controls to change the Shadow Color to white, increase the Opacity to 100, change the Projection Distance to 4, and adjust the Light Source with your subject.
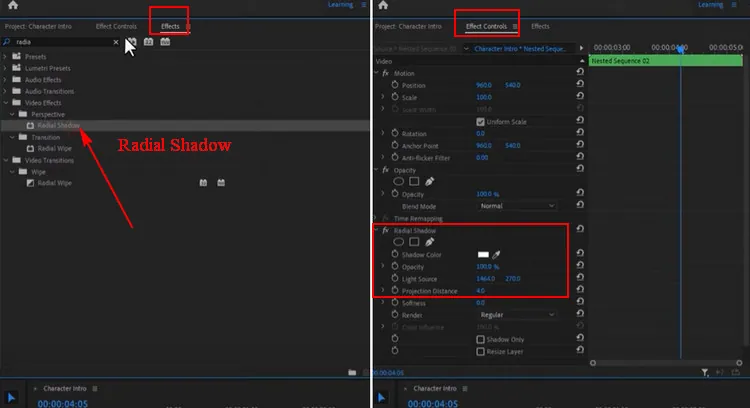
Character Intro Freeze Frame Effect with Premiere Pro - Outline the Subject(Character)
It's almost done for a freeze frame character intro! Here move the bottom clip layer to the end of your freeze frame layer.
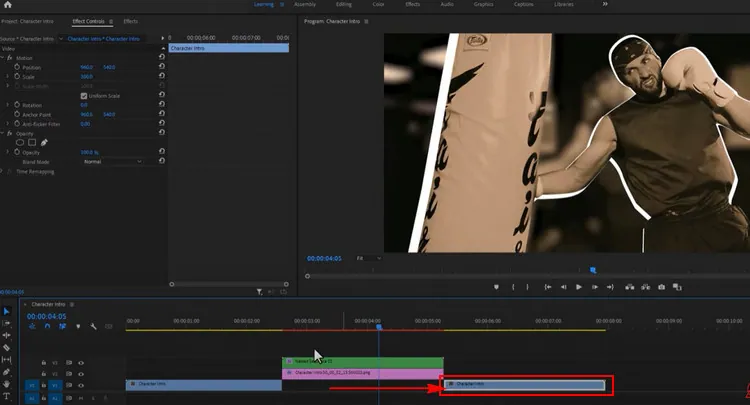
Character Intro Freeze Frame Effect with Premiere Pro - Adjust Clip
Add Text to introduce the Character - Finally, we need to add the text to introduce the character, just select the Type tool on the bottom left tool menu, and type your text directly, and then go to the to Windows tab on the top menu and select Essential Graphics to edit the text at will.
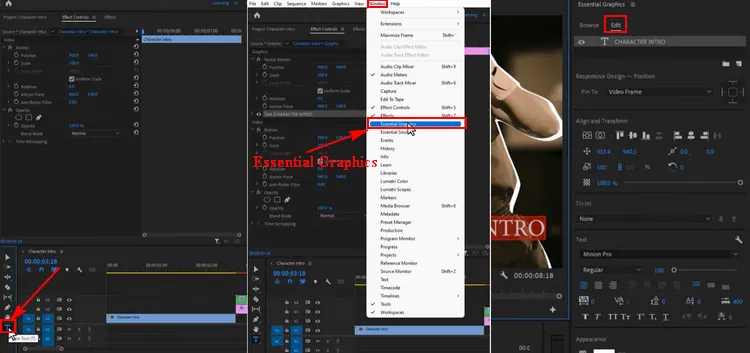
Character Intro Freeze Frame Effect with Premiere Pro - Add Text
Bonus: Easier Alternative to Character Intro Freeze Frame Effect Online
Follow the detailed steps above, you can create amazing freeze frame effect character intro in Premiere Pro. In case some of you might find that it is too complicated to find a certain feature, we provide you a more direct way to create freeze character introduction screen - FlexClip.
With FlexClip, you can effortlessly create a stunning character introduction animation with its freeze effect, and more other useful tools and features. Let’s learn some of its best features to create amazing character introduction freeze effects.
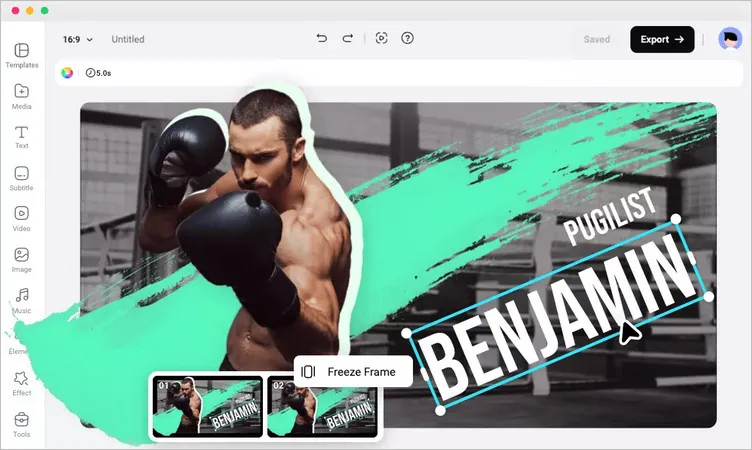
Character Intro Freeze Frame Effect with FlexClip
Key Features of FlexClip for Making a Freeze Character Intro:
Go to FlexClip to give this amazing tool a try! No download, no complicated process involved.


